Crucian carp is a fish of the carp family and lives almost everywhere throughout central Russia. Crucian carp feed on almost everything, from algae to worms and insects that have fallen into the water. The crucian carp that lives in the middle zone is usually medium-sized, but the crucian carp that lives in the lower reaches of the Volga sometimes reaches the size of a small carp. There are two varieties of crucian carp in the middle zone:
- Silver– not very large, covered with medium scales of light shades. Handles transportation well.
- Gold- slightly larger than silver scales, relatively large, yellow in shade. Does not tolerate transportation well.
Contents
Float tackle
 (or “float rod”) is perhaps the most popular and sporting equipment for catching crucian carp. It consists of a rod, reel, fishing line, the float itself, a sinker and a hook with a nozzle.

Also read the guide on, which will come in handy when fishing with a float and other gear.
Feeder tackle
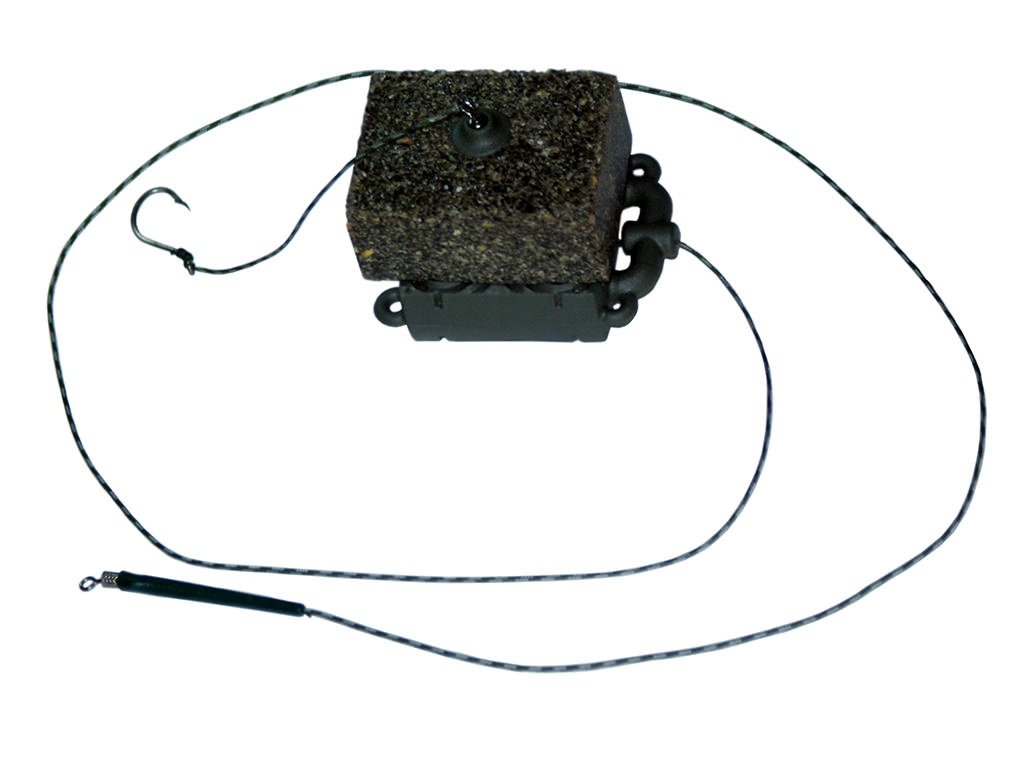
 The feeder rod () should be selected depending on the conditions (reservoir, weather). So, for large bodies of water with strong currents (rivers, reservoirs), a tackle with a large rod weight of up to 120 g is suitable. For small bodies of water, a tackle with a rod up to 60 g and a small feeder is suitable. Rods with a length of 3.5 - 4 meters are the most versatile and have a good price-quality ratio. When choosing a feeder, you should take products weighing slightly less than the test rod, since the rest of the weight will be “taken” by the bait.
Lure must also correspond to the reservoir (). When fishing on a body of water with a strong current, the bait should be dense enough so that it does not wash away, and on reservoirs with a weak current or standing water - as light as possible so that it does not sink in the muddy bottom. For the latter option, a base of breadcrumbs is suitable.
To prevent the fish from quickly getting enough and thus losing interest in the bait, the components of the bait must be small. Crucian carp do not have specific taste preferences, so there can be no unambiguous and clear advice on how to make bait. For scent, you can add a little grated garlic, ground seeds, vegetable oil or even ground cookies to the bait.
Baits. As with bait, there is no advice on what to fish with. The taste preferences of crucian carp can change even during the day. We can only say that crucian carp bite well on pasta, corn, pancakes, and rye bread dough flavored with garlic.
fishing line A cross section of 0.12 mm is suitable. If there is a chance of carp or other strong fish biting, it is better to take a fishing line of about 0.2 mm. The leash should be made in this case from a thinner fishing line. The nozzle should be such that small things like roach or bleak cannot swallow it. It is better to use hooks from No. 5 – 7 to No. 9. The latter is suitable for large crucian carp. Also, the hooks should be as sharp as possible, otherwise there may be problems with hooking fish.
Tops (quivertypes), like other tackle, should be selected depending on the conditions. In the current and in the wind, the tip should not be very sensitive so as not to react to these factors and not create false bites. When fishing on a still body of water in calm weather, it should be more sensitive so that the angler can see even the most sluggish bite.
The simplest equipment for crucian carp- paternoster.

The technique of catching crucian carp with a feeder is described.
Crucian carp killer tackle

We won’t repeat ourselves - there is information about this gear. And the design is a regular feeder donk with 3 feeders and 3 hooks.
 A makushatnik is a special tackle for fishing using cake. Usually carp are caught with it, but sometimes crucian carp is also caught with it. In view of this, it is possible to catch crucian carp with it purposefully. Fishing for crucian carp on top has several features.
Spinning rods are often used as gear, but more professional fishermen use feeders.
- You can use a crucian carp bait together with makukha – the most commonly used are worms and granules. Worms can be used either as dung or crawling worms, which can be found in the city or bought at a fishing store, or as “shore” worms, which can be obtained directly on the spot. Granules are used in anise, dill, hemp, corn, raspberry or strawberry flavors. The granules are placed two per hook.
- You can also use regular carp rigging, hooks can either be placed in the cake or left free. You can buy the cake flavored or flavor it yourself. Anise, hemp, dill and strawberries are suitable.
Despite the apparent simplicity at first glance, there are many nuances in equipping float gear that every angler should know about. Proper equipment of a float rod guarantees ease of use of the tackle and reliability when playing fish.
Depending on what type of reservoir and under what conditions the fishing takes place, the angler uses different types of float rods. Fishing rods for float fishing are divided into 4 categories:
- flight feathers;
- Bolognese;
- match;
- plug-in
Flight feathers are the most common group, used for fishing in stagnant bodies of water or on rivers with moderate currents. The casting range when fishing with fly tackle is determined by the length of the rod, which can range from 3 to 12 m. Due to the limited casting range, fly rods are used to fish in small bodies of water or in places where the channel edge or hole is located in close proximity to the shore.

The Bolognese float rod is used for fishing on rivers with weak and medium currents. This tackle is equipped with a spinning reel and rings, which allows you to fish at some distance from the shore. The length of Bolognese fishing rods ranges from 4 to 8 meters.
Match float tackle is used for long-distance fishing. The match fishing rod is equipped with an inertia-free reel and a heavy float with its own weight, which allows you to cast the equipment 30–60 m from the shore. The length of fly rods rarely exceeds 6 m.
A plug rod for float fishing can be used in both standing and flowing reservoirs. It is more often used by sports fishermen, since it requires certain handling skills. Plug fishing rods are equipped with a rubber shock absorber located inside the working part of the rod, which is called the “whale”. The length of such fishing rods reaches 15 m.
Necessary elements for float gear
The presence of certain elements in the equipment depends on the type of float rod. The blind equipment of a float rod for fly fishing includes:
- connector;
- main line;
- float;
- set of weights;
- leash;
- hook.
The connector is used to attach the main line to the rod and can be made in various versions. The main equipment is concentrated on the main line, which includes a float and a set of sinkers. Floats for fly fishing can have a body of various shapes, equipped with a keel, antenna, and also a ring for passing the fishing line. Their load capacity can range from 0.1 to 10 g. A set of sinkers consists of lead pellets of various weights, which are necessary to load the float.

Connectors
A leash is a necessary element that protects the entire equipment from breaking if the hook gets caught. Its diameter is usually 0.02 less than the diameter of the main line. The hook is used to attach bait and ensure reliable hooking. Its size is selected taking into account the type and size of the nozzle.
The equipment of a Bolognese fishing rod differs from that used for fly fishing tackle. The equipment of a float rod for fishing in currents consists of the following elements:
- rods with rings;
- inertia-free or inertial coil;
- main line;
- Bolognese float;
- olive sinkers;
- swivel;
- leash;
- hook.

The inertial reel is also suitable for float tackle
The Bologna rig includes a spinning reel of size 3000–3500, on the spool of which a monofilament line with a diameter of 0.15–0.18 mm is wound. It would be good if the reel had a large additional number of bearings, which would allow you to quickly reel out the line after a single hookup. The Bolognese float differs from the fly float in having a greater load capacity and a through hole for passing fishing line. The swivel is necessary to prevent the leash from twisting in the stream. The size of the hook for fishing with Bolognese tackle is usually slightly larger than that used for fishing in still water. This is due to the fact that fish in the current take the bait more boldly and resist more desperately.

Elements for equipping float gear
The equipment of the plug tackle differs from the fly version by using thinner lines and light floats, which makes it possible to catch capricious fish. The match gear is characterized by the presence of an inertia-free reel and a heavy float, which has its own carrying capacity and ensures long-distance casting of the nozzle.
Attaching the fishing line to the float rod
The reliability of the tackle, as well as the speed and convenience of replacing the equipment, depend on the method of attaching the fishing line. When assembling the fishing rod, the main fishing line can be attached via a connector or via a reel.
Attaching to a fly rod
Any fly rig must have a loop at the end, through which it will be attached to the tip of the rod. A connector is used to attach the equipment to a fly fishing rod with a float. There are three types of similar connectors:
- plastic design with lock;
- rope loop;
- a piece of rubber shock absorber.
The most convenient way is to use a purchased plastic connector. This element has a small clasp that closes after inserting a loop into it. There is a small hole in the connector for attaching to the tip of the fishing rod. The diameter of this hole must correspond to the diameter of the tip of the whip, so the connecting element should be selected when purchasing a fishing rod. A correctly selected connector should be pulled onto the tip of the whip with little effort. To securely fix the plastic element, the fisherman will have to use superglue.

When equipping a float rod with a blind rig, a connector made from a rope loop can be used. To make it you will need:
- take a piece of synthetic rope 5 cm long and 1–2 mm in diameter;
- take a braided cord with a diameter of 0.1–0.12 mm, which will be needed to secure the rope;
- fold the rope in half;
- wind the folded rope to the tip of the whip so that you get a loop with a diameter of 0.5 cm;
- saturate the winding with superglue.
Such a connector is easy to manufacture and will allow for quick replacement of equipment. This design uses a loop-to-loop fastening method.
The third type of connector is a piece of rubber shock absorber, which can be used as bottom or plug rubber. To make it, you will need a piece of elastic 7–10 cm long, one side of which is wound to the tip of the whip with a braided cord, and at the other end a loop is formed for attaching the fishing line. This connector increases the shock-absorbing properties of the rod, which allows you to use thinner fishing line and smaller hooks.
Attaching to a Bolognese fishing rod

Inertial reel attached to a Bolognese rod
In Bolognese gear, the equipment is attached not to the rod itself, but to the reel that is installed on it. Most Bolognese fishing rods are equipped with a special reel seat designed for installing the reel on the tackle. If the purchased model does not have a reel seat, then you can put the reel on the fishing rod in another way. To assemble a fishing rod and reel you will need:
- drop a little superglue on the part of the reel foot that will be adjacent to the rod;
- install the reel in the center of the butt so that its spool is in line with the first wire ring;
- fix the coil for 1–2 minutes until the glue dries;
- attach the reel foot to the butt of the rod with a braided cord;
- saturate the winding with superglue.
The tackle can be used after the glue has completely dried. A self-tightening loop can be used to attach the main line to the reel spool.
How to properly equip a float fishing rod with a float
The float is the main element in the float tackle, responsible not only for timely registration of bites, but also involved in delivering the bait to the fishing point. Its performance characteristics largely depend on the method of fastening the float.
Float selection

Professionals often prefer a float weighing up to 2 grams
The fly tackle is equipped with a small float made of balsa or other materials with a high degree of buoyancy. The carrying capacity of a float for a fishing rod with blind equipment rarely exceeds 8 g. This bite alarm consists of the following elements:
- bodies;
- keel;
- antennas;
- ring for passing fishing line.
For standing water, oblong-shaped floats are used. When fishing in the current, preference should be given to spherical signaling devices. In fly fishing, the float serves only as a bite alarm and does not take part in casting the equipment.
All Bolognese floats have a drop-shaped or spherical shape, more suitable for fishing with a float rod in moderate current conditions. Bolognese signaling devices differ from flywheel signaling devices in having a greater load capacity. In addition, in the Bolognese version, the line is passed not through a wire ring, but through a hole located in the body of the float, which avoids damage to the alarm during casting and vigorous hooking.

Attaching the float to the fishing line using cambrics
For match fishing, floats 20–40 cm long are used, which have their own weight and lower attachment point. This design gives the alarms good aerodynamics, which allows fishing at a distance of 40–60 m from the shore. The load capacity of match floats ranges from 2 to 25 g.
The plug-in equipment of a fishing rod for fishing in still water requires the use of light floats with a carrying capacity of no more than 1 g. For pole fishing in strong currents, flat floats are used that have excellent hydrodynamics and can withstand the directional flow of water. The load capacity of flat floats can vary from 3 to 15 g.
Attaching the float to the fishing line
The flywheel indicator is attached to the fishing line using 2-3 cambrics, which are first put on the main fishing line and then pulled onto the keel of the float. The plug and Bolognese versions are attached to the main line according to the same principle. Fastening through cambrics makes it possible to quickly change the working depth while fishing.
The match signaling device can have a stationary or sliding mount. In the stationary version, the float is attached using a special connector, which is a piece of wire with a diameter of 0.5–1 mm, with cambrics stretched over it. The signaling device is connected to the connector using a carabiner with a swivel. To assemble the sliding rig, the fisherman will need:
- tie a stop knot on the main monofilament thread;
- put a bead with a diameter of 2–3 mm on a monofilament thread;
- attach a swivel with a carabiner to the monofilament;
- attach the float to the carabiner.
With such equipment, the bottom limiter, which will prevent the swivel from flying off, will be a sinker installed a meter from the hook. The working depth of fishing changes due to the movement of the stopper unit along the monofilament.
Proper float loading
A properly loaded float allows you to register the most careful bites. To properly load the float, the fisherman needs to have a weighted set of weights and small pliers.
How to load a float on a pond

Loaded float with two pellets and a pad
Having a set of lead pellets with him, an angler can quickly equip a fishing rod right on the shore of a reservoir. To load the bite alarm you will need:
- fasten the sinker at the junction of the leash and the main fishing line;
- clamp the main part of the sinkers, whose mass is equal to 2/3 of the load-carrying capacity of the float, one meter above the feeder;
- the rest of the pellets are secured between the sub-frame and the main set of sinkers until only half of the antenna is visible above the water.
If you plan to fish with large baits that have a significant own mass, then the float can be slightly underloaded.
How to load a float at home
At home, a bite alarm is placed in a high container, with a piece of fishing line about 10 cm long attached to its keel. The fisherman sequentially clamps weights of varying weights on a piece of monofilament until the desired position of the float in the water is achieved.
Having loaded the alarm with half of the antenna, the fisherman removes the pellets and installs them on the working equipment. The density of water in a pond may differ from that at home, so you should always have at least 1-2 pellets with you to reload the float.
Leash attachment
It is impossible to assemble a fishing rod correctly if you do not think about such an element of equipment as a leash. This part is very important because it has direct contact with the fish during fishing.
What should a leash be like?
This element of the float rod equipment should be 0.02 mm thinner than the main fishing line, which will ensure the safety of the equipment when the hook is caught. The leash is knitted from high-quality monofilament with a diameter of 0.06–0.16 mm. The length of the leash for fishing in a still water body is from 12 to 30 cm. When fishing in a current, the length can increase to one and a half meters.

Leash with hook attached using a small swivel
When fishing, you must ensure that the leash does not twist. If a fisherman notices any damage to the leader line, the leader must be replaced immediately.
How to connect a leash to a fishing line
If fishing takes place on a lake or reservoir, in the complete absence of current, then the leash is connected to the main monofilament using the “loop to loop” method. When it comes to fishing in flowing waters, the leash should be attached to the main line using a small swivel, which will prevent it from twisting during fishing.
How to properly tie a hook to a fishing line

When installing a float rod, you should pay special attention to the selection and tying of the hook. The degree of realization of bites largely depends on this element of equipment.
Hook selection
When fishing with a worm, barley or corn, hooks of the classic shape No. 12–4 (according to the international classification) are used. To fish for maggots or caddis flies, use hooks No. 16–12. If the angler uses bloodworms as bait, then the hooks should be made of thin wire and correspond to the number 24–18.
When fishing with dough or other soft baits, it is better to use hooks with a spring coil. A small spiral will reliably hold the soft bait during the fishing process.
How to knit
If the hook is tied correctly, the monofilament practically does not lose its breaking load at the knot. To properly attach the hook you need:
- turn the hook with the back side facing you;
- pass the end of the monofilament through the eye and attach it to the fore-end;
- point the end of the fishing line towards the eye;
- wrap the monofilament around the shank 5–6 times and pass its tip into the loop formed at the bend of the hook;
- moisten with saliva and tighten.
Wetting the assembly when tightening will prevent it from burning out. The tip remaining after tying must be cut off.
Almost anyone can make a simple donk for fishing, even someone who has just begun to delve into all the intricacies of this art.
How to make donka
Usually an elastic rod is used, the material of which can be bamboo, or, which is more accessible for our latitudes, hazel. As a rule, a length of 1 - 1.5 meters will be quite enough. If the end of the rod you have chosen is too thick, then it is advisable to sharpen it. The cheapest inertial reels are usually used to wind the fishing line. Line lengths of 30 - 50 meters are enough for comfortable fishing.
It is better to choose the diameter of the fishing line used in the range of 0.4 - 0.6 mm. A tube made of vinyl chloride or rubber is attached to the end of our improvised donkey. A fishing line is passed through it and fixed on the tip of our donkey during fishing. We use a second tube of slightly larger diameter to insert the wire from the signal bell.

After this, we need to secure the weight to the end of the fishing line. If you use this donkey for fishing in stagnant water, then the size and shape of the load do not matter much. When fishing in running water, you will need a heavy and preferably flat sinker, weighing at least 100 - 150 grams. If you wish, you can make such a load yourself. A regular tablespoon is perfect for this. When connecting the line to the weight, be sure to use a swivel, otherwise your line will inevitably twist and eventually become tangled. Having stepped back from the load by about 30 - 40 cm, you can attach the first leash, and also use the swivel in tandem with the carabiner.
As a rule, such leashes are installed in quantities from 3 to 5 pieces. To feed peaceful fish, you can additionally install a feeder. The hooks you use depend on the type of fish you are trying to catch. For peaceful fish this is No. 5 - 8, for predatory fish, such as pike and perch - No. 9 - 12.
Making fishing tackle with your own hands, as well as fishing itself, is an exciting process. Professional fishermen improve their skills by creating high-quality gear that increases the catch tenfold. In this case, a variety of techniques are used. All available fishing tools will always be individual and unique, since do-it-yourself fishing gear is a purely creative process.
Materials required for work
- Wood (planks or bars). You can cut wobblers or poppers from it.
- Metal plates - suitable for the petals of rotating spinners.
- Various wires for creating fastenings and rings for our baits.
Frequently used tools
- hammer;
- saw;
- sandpaper;
- file;
- primer;
- paints;
Making wobblers
To make a wobbler with your own hands, use hardwood 5 cm long in the form of an oval, narrowed on one side.
- To begin with, we obtain a workpiece by sawing off a 1.5 cm block from the main board.
- On the block we draw the outline of the future wobbler fish with a pencil, after which all excess is gradually cut off with a knife.
- In the front part, as shown in the figure, we first mark it with a pencil, then cut out a cavity for the future blade.
- The belly is also sawn through the entire length of the wobbler, where we will insert a fastening made of wire, as shown in the figure.
1. It is advisable to use stainless steel wire. 2. If you do not want to use rings to attach tees, take care of inserting them before twisting the wire into the rings.
- We insert the wire fastening, filling it with epoxy glue.
- The wobbler is coated with waterproof varnish, and after drying, tees are hung on it.
- To select the level of buoyancy, lead weights are used, attached to the holes of the abdomen between two loops: nasal and abdominal. Then the wobbler can be sanded and varnished so that its body does not absorb water.
- Using thin and soft aluminum from drink cans, a blade is created that is glued into the wobbler.
Manufacturing of oscillating spinners (oscillators)
Oscillating spoons or spinner spoons can also be made with your own hands.

For their manufacture use:
- a cross-shaped hammer with balls at the ends and a metal handle;
- wooden boards with a spoon-shaped recess;
- rubberized steel shaft for “rolling” part of the product;
- metal ball;
- drill and drill bits;
- hacksaw for metal;
- steel stylus.
How to make a vibrator petal:
- Create the desired fixture template on cardboard.
- Draw a contour using a stylus on a sheet of metal with a given thickness of 1.5 mm.
- Then the sheet is clamped and the template is cut out with a hacksaw.
- The workpiece is fixed in the recess of the board, beaten with a hammer, and rolled to strengthen one of the sides of the spoon.
- Correct with a hammer.
- Uneven edges are removed and holes are created for factory-type rings.
Spinner spinners

Wire. You need a spinner frame based on rigid stainless steel wire with a length of at least 100 mm. Diameter – 0.8 mm. The bent shape of the wire is straightened using pliers, slings and clamps.
Petal. As a petal, you can use aluminum from 0.33 liter cans. You can even cut the petal with scissors; aluminum is very soft. Holes for inserting the petal onto the main wire are made with a thick needle and pliers.
Assembly of the structure
- A ring is created at one end of the wire by bending the end of the wire with pliers.
- Then the bead is put on.
- Then the petal.
- Then another bead.
If you want to make your spoon heavier for fishing at depth, use a longer wire and insert a sinker with a hole between steps 4 and 5.
5. A tee is inserted and a ring is created in which this same tee will be. Or you can use small rings, for example, to change a tee to a fly.
Homemade castmaster
 Castmaster is made independently based on a metal hollow tube with a cross-section of 16 mm (for example, a spout from a faucet mixer) and lead. The available tools include a hacksaw, a drill, a drill (D 2.5 or 3 mm), a flat file, a vice and a caliper, including the original castmaster model.
The vice is clamped into the pipe, the workpiece is sawed off, the cut angle is made as in the original castmaster and measurements are taken. Holes are drilled exactly in the middle at the ends of the workpiece, and the inside is tinned so that the lead does not fly out during fishing. The holes are sealed with masking tape, after which the workpiece is placed on a flat surface to dry, the remaining cracks are covered with molten tin using an electric soldering iron. If necessary, sandpaper is used and lead is drilled through the holes on the metal tube.
Balancer for winter fishing or vertical fishing
A homemade balancer is a three-dimensional bait in the shape of a real fish. It is created on the basis of alloys and low-melting metal. The hooks are placed in the head or tail of the fish, pointing the sharp end upward. The back and belly have two loops. One for attaching to a fishing line, the other for a tee.
Foam rubber in the shape of a fish
 Homemade foam fish bait of domestic know-how. Household sponges of various colors are required. Before processing, moisten and squeeze. Using a blade, the required block of a certain shape is cut - in the form of a fish 3-8 cm in size. Then they are painted with waterproof markers, or not painted; now in stores you can buy sponges for every taste and color.
The jig head is attached without the intervention of glue. And if you want to fix a tee in the fish, you need to make a small cut, insert the tee and seal it with waterproof glue.
Making jigs with your own hands
Homemade jigs are made using casting (lead, lead-tin alloys), soldering (tin and lead alloys), and the instrumental method (tungsten). The latter method cannot be used at home.
You need a form that can be made from plaster poured into matchboxes, and put a jig in the center. After the plaster has dried, remove the jig, clean off any uneven surfaces and cut channels for supplying tin to the hollow area for the future jig.
It must be remembered that lead is a toxic alloy and it is better to smelt it outdoors, or in a special mask, so as not to inhale the fumes.
Homemade sinkers
Sinkers are cast in a similar way to a jig. A lead pouring mold is required.
 It is made from a large sinker into which a ring with a small cut is soldered, as shown in the figure. This cut will allow you to insert the line of your tackle without breaking the tackle. And it is advisable to use a strong fishing line for unhooking, you can use a braided cord or nylon thread.
Electronic bite alarms
To create a homemade electronic bite alarm, you need an electronic and bite alarm (in the form of a bright plastic barrel with a latch) alarms, which have a mount on the rod and a bicycle spoke. A knitting needle is attached to the signaling roller, and a barrel is attached to it on the other side. This structure is attached to the rod stand.
Artificial baits (baits)
For fishing with a float rod, artificial baits simulating worms and maggots are sometimes used. These baits need to smell appropriate, so take care to wet the bait with a very small amount of scent. For example: garlic drops, anise, vanilla.
When there are no baits for fishing, professional fishermen use artificial baits:
- wet and dry flies based on wool, feathers, colored threads;
- bugs based on cork or foam;
- "goat beard"
Let's sum it up
When making fishing tackle, you can use any available means. And there can be a great many variations of baits and equipment. It is not at all necessary to do as others do and as described in the manuals. The main thing is to understand what the final product is, and then come up with an alternative solution for making a similar bait.
Surely every fisherman has made fishing gear with his own hands at least once in his life. This process is fascinating in its own way and useful for the future catch: what is made taking into account your own wishes is still more reliable and convenient than store-bought products.
For many lovers of river hunting, the process of making summer fishing gear is no less attractive than the fishing itself. And the financial issue in this matter is also important. High-quality products from well-known manufacturing companies are often inaccessible to amateurs with average incomes due to their high cost. This is where your own imagination and the experience of experienced fishermen with experience come to the rescue. And scrap materials, as a rule, can always be found.
Types and manufacture of gear
Float rod
There are several options for float tackle:
Each fishing rod has its own advantages and disadvantages; most often today the Bolognese version with a telescopic fishing rod is used, which allows fishing at medium distances and depths.
The Bologna float fishing rod consists of the following structural elements:
- the actual fishing rods with guide rings;
- coils - it is better to use ;
- the main line, - both are used, and ;
- float;
- sinkers;
- leash with hook;
- To attach the leash to the main line, it is advisable to use a swivel.

Assembly should begin by strengthening the coil. Most Bolognese fishing rods are initially equipped with a reel seat, but if such an element is missing, you can attach the reel yourself. The procedure here is simple:
- drop glue onto the part of the reel that will be in contact with the rod;
- install the reel so that the spool is in line with the guide rings;
- fix the position of the coil and let the glue dry;
- Wrap the reel legs to the rod with braided cord or electrical tape; for reliability, this connection can also be impregnated with glue.
For fishing in still water, oblong-shaped floats are usually used, and spherical ones in currents. The weight of the float is important: such a ratio of the weight of the sinker used and the float itself, when the latter does not lose sensitivity and is clearly visible on the water.
Expert opinion
Knipovich Nikolai Mikhailovich
Important! When checking the load at home, keep in mind that the density of water, say, in a standing reservoir, is slightly higher than ordinary tap water.
You can make your own sinkers from flattened lead strips, but you should buy hooks. You should not tie them to a leash with a regular knot; such a knot is fragile and very noticeable. Usually, the end of the fishing line that is passed through the eye is wrapped with a leash several times, after which the end is passed through the eye again and tightened.
The leash is attached to the main line using a swivel. This is not only convenient when changing gear, but also prevents the leash from wrapping around the main line in strong currents.
Circle

This original tackle is used mainly for pike fishing. Interestingly, you can immediately use several circles at a certain distance from each other, which increases the likelihood of a good catch.
Making a mug requires a certain skill:
- to begin with, the material for the circle is selected - experienced fishermen recommend using linden, but ordinary polystyrene foam will do;
- a cut is made along the edge for winding the fishing line;
- a mast is inserted strictly in the center, at the top of which a cut is also made;
- if you want the circle to serve you for a long time, cover it with drying oil before painting;
- It is better to paint the upper part of the structure red. and the bottom one is white.
When a gray predator grabs a live bait, the line comes off the mast slot, the circle turns over and spins on the water, unwinding the line. All that remains is to make the cut in time. During fishing, the circle floats freely, which allows you to imitate the natural movements of live bait.
Zakidushka

This is an old grandfather's tackle, which is distinguished by its extreme ease of manufacture and low cost of materials. To construct a simple zakudushka, you should perform a number of simple steps:
- cut a reel from wood or foam plastic on which the fishing line will be wound;
- wind the main fishing line of the required length around it;
- Attach a sinker and leashes with hooks to the end of the fishing line.
Before casting the tackle, the reel is attached to a pole or strong stick, and after casting, a signaling device in the form of a colored piece of foam plastic or a bell is installed in front of the pole.
Expert opinion
Knipovich Nikolai Mikhailovich
Zoologist, hydrobiologist. I am interested in fishing at a professional level.
Important! The main line must be strong, since the sinker at the cast is quite heavy, which increases the casting distance.
The sinker itself can be purchased at the store, but it is often smelted from lead in an ordinary metal spoon. You just need to remember to leave a hole for attaching the fishing line.
Donka
In fact, this is the same throw, many do not separate them, but it is still believed that the throw is thrown by hand, and the donka is launched on a boat or sent into the water using a spinning rod.
In addition, donka today are often equipped with a special feeder; this tackle is already called feeder.
Rubber
This is also a variant of bottom tackle, only equipped with a rubber shock absorber. It is made like this:
- measure a piece of fishing line of the required length;
- make a loop at its end, an elastic band will be attached to it;
- make loops for tying leashes;
- tie the cord to the sinker with a loop at the end;
- use an elastic band to connect the fishing line and cord with a sinker;
- Wind the fishing line and elastic band onto the reel.
The sinker is usually wound on the boat because its weight must be such that it remains on the bottom after the elastic is pulled. The casting location can be marked using a foam float.
Typically, the ratio of the length of the elastic band and the distance of fishing for fish is 1:5. A typical elastic band can stretch 6 times, but this is already on the verge of breaking.
Constriction
Our grandfathers and great-grandfathers also used the classic tug. It is made extremely simply:
- take a thick fishing line or rope 2 times longer than the width of the river;
- a ring is made from it, one end of which is wrapped around something on the opposite side of the reservoir;
- leashes with hooks are tied to a fishing line or rope;
- When biting, the fishing line is pulled towards you by the desired side of the ring.
Today, a spinning rod is often used to make a tug, the end of the fishing line is tied to an elastic band, and the elastic band is secured on the opposite bank.
There is also the option of double fishing, when fishermen are located on different banks and tie the line of two spinning rods together. However, this method requires a certain skill in interaction between two fishermen. If they start fishing for fish after biting at the same time, of course, this will only lead to damage to the gear.
Since drag fishing refers to fishing at the surface of the water, insects or insect imitations are usually used as bait.
Ship

This gear is not as complicated as it seems at first glance:
- production should begin by cutting out the planes, making 2 trapezoids from wood;
- the far trapezoid in the design should be larger than the near one;
- the planes are treated with drying oil;
- painting is done later;
- the planes are connected with metal strips or screws at a distance of 10-20 cm;
- A cord is attached to the boat.
Fishing in this way is especially suitable where it is difficult to deliver the tackle to the desired place by swinging or casting, for example, from the shore with overhanging vegetation. And the boat simply floats downstream to the required distance.
Homemade baits
Spoons
There are 3 main types of homemade spinners:
- – they are used in winter.
Hesitating

Making vibrators that imitate the play of a fish is quite simple:
- take the handle of a regular spoon;
- at one end make a hole for a ring;
- on the other - for a tee.
This spoon, despite its simplicity, is very catchy, as it resembles a bleak, and for pike this is the most desirable prey.
You can cut such spoons from tin cans, from copper and brass blanks.
A spinner made from ordinary medical tweezers turns out to be very interesting. In this case, one side should be left smooth and the other grooved.
Turntables

Pike perch loves these tackles. You can make a rotating spinner like this:
- a template is cut out of cardboard;
- it is applied to part of the tin can;
- the workpiece is cut out;
- its ends are cleaned with sandpaper;
- holes are made at the ends of the workpiece;
- the ends are bent at an angle of 90 degrees;
- A bead is installed on one part, the hook is attached in a hanging position.
Such a spoon can be painted in a bright color - pike perch always pays attention to bright colors.
Mandulas

This is a rather unusual tackle, which, however, can be catchy on a particular body of water. The source material will be:
- doubles or tees;
- nylon thread;
- moisture-resistant glue;
- lurex, preferably bright red;
- a piece of metal wire;
- polyurethane.
The action happens as follows:
- Circles of the same diameter but different colors are cut out of polyurethane;
- the circles are connected with glue;
- The result should be something like a barrel, but the shape can be different;
- a through hole is made in the center;
- a wire is threaded into it;
- loops are formed from the ends of the wire for the hook and attachment to the fishing line.
- Using thread and lurex, a kind of fluffy tail is attached to the double or tee.
The mandula can be constructed from several movable sections, and flexible curlers can be used as the starting material.
Foam rubber

It is very easy to make foam rubber baits yourself:
- take a piece of foam rubber or sponge;
- a fish-shaped blank is cut out of it;
- cuts are made in the workpiece where the hooks are attached;
- If necessary, the tackle is painted in the desired color.
It should be noted that foam rubbers are not very active in the water when playing, so wiring them requires a certain skill. The use of a sinker is also necessary.
Equipment elements
Bite alarms
They are necessary especially for bottom and feeder fishing. There are simple ones that sag on the fishing line in normal condition and rise up when bitten. However, they are not always effective during night fishing or when the gear is located at a certain distance from each other. An ordinary bell often falls and gets lost.
To correct these shortcomings, sound and light alarms were invented. True, they also have a drawback: the cost of such structures is sometimes still high and they often fail due to mechanical damage.
The craftsmen quickly found a way out, using a portable buzzer and a lighter flashlight. The design is designed in such a way that when the fishing line is pulled, the terminals on the battery are closed and a signal is given. You can fasten everything with ordinary electrical tape.
Feeder for feeding fish from a boat

Fishing from a boat often requires the use of feeders to attract fish. Factory-made options are often bulky and expensive. But you can make such a feeder yourself. Moreover, quickly and without high costs.
To do this you will need:
- a piece of plastic pipe of the required size;
- steel wire;
- rivets;
- lead load;
- rope;
- drill;
- loop to secure the lid;
- hacksaw.
The manufacturing process looks like this:
- the required section of pipe is taken;
- Covers are made from plastic plugs, which can be bought in the same place where the pipes are made;
- the top cover is tightly secured with rivets;
- a rope bolt is mounted into it;
- the bottom cover is attached through a loop;
- the clasp of the bottom cover is made of wire;
- Holes are drilled in the feeder and a weight is attached to it.
Floats

Today, floats can hardly be classified as expensive equipment, but there is always a temptation to make this equipment yourself. The choice here is very large:
- made of polystyrene foam - for example, a toothpick is inserted into a blank made of this material, and the structure can be painted with nail polish;
- A wine stopper is also almost universal;
- A float made from a goose or duck feather is very sensitive; only its surface part should be pre-painted;
- If you take nail polish on a fishing trip, you can make and paint a float from an ordinary reed in a similar way.
Sinkers
It has already been said that the sinker for the donkey can be melted in an ordinary spoon. The main material for making this gear is lead. It melts well, is processed and has a high specific gravity. Some manage to add cupronickel to the alloy, but it does not add any new properties to sinkers of any type.
Expert opinion
Knipovich Nikolai Mikhailovich
Zoologist, hydrobiologist. Graduated from Leningrad State University named after Zhdanov, Faculty of Biology and Soil Sciences. I am interested in fishing at a professional level.